I thought it was time to have a good tidy out and clean up before starting to do the next part!
Having dismantled my temporary spray painting booth, I could relocate the bike (minus her fancy tinware) into her new home. She's a lot safer in there and protected from damage.
It seems like such a long time since I've had this much space in the workshop! While I was at it, I cleaned and sanded down the workbench, which had got VERY grimy during the restoration, and treated it to a couple of coats of teak oil to protect it a bit. I also removed the vice temporarily to prevent the risk of any damage to parts if I'm working on the bench with them.
This all feels a lot nicer to work in ☺.
Now the scary business of doing the pinstriping could start! At the Stafford Show in 2022, I'd seen a demonstration of the Beugler Pinstriping Tool and had a go myself on the stand. It certainly seemed fairly straightforward to lay down nice even width curvy stripes on a piece of paper, but I was assuming that it would not be that straightforward when I came to doing it on a curvy chunk of metal. I was also unimpressed with the price of around £260 to get multiple width heads that I would need! But I was still driven to find a way to do it myself, as almost everything so far has been my own work.
I was veering towards either masking a stripe somehow or using vinyl tape, when I came across an old but hardly used Beugler kit on Facebook Marketplace. After a little haggling, I got it for £40 - much more like it. I figured that I can probably sell it on afterwards or keep it for future projects at that price.
Enough of that! Of course, the salesman at the Stafford Show had made it look super easy, but once I had a practice on some paper, it kind of was. That's not to say that I didn't make any cock ups and the finished product is far from professional but fits easily into my "good enough" standard.
 |
| The tool is essentially a syringe with a knurled wheel which picks up an even paint film |
 |
| Straight lines were easy! |
 |
| Curved lines more challenging - it mostly came down to confidence! |
Here's how I did it.
First I flatted back all of the paintwork to get an even matt finish. This ensured good paint adhesion, but was also in readiness for ultimately clear coating the paint. The tank is part way through being done here.
The pinstripes were going to be a roughly 2mm wide gold one, sitting against the green/grey boundary line, and then a slightly narrower red one sitting about 2mm inside that. I wanted to set a line of tape that I could use not to mask but as a guide edge for both the stripes.
So I got some 2mm wide masking tape and stuck that down as smoothly as possible in the position that would ultimately be where the gold stripe would go. ("A" in photo below.)
Then I ran another line of tape inside and just touching that one ("B" in photo below.)
Removing the original line of tape ("C" below) left me with a guide line parallel to the green/grey border and this became my guide line.
This photo shows the first gold stripe which I really used the green/grey paint junction as the guide line for in practice.
The curves on the tank were easier than expected actually.
After allowing a day for the gold stripes to dry, I did the red. I found the red harder for some reason - I think because I was trying hard to keep the lines parallel - so it didn't feel as natural or smooth as when doing the gold. I had to stop at a couple of points and wipe off what I'd done with white spirit, then start again. I did the mudguards first so that any mistakes would be on less obvious areas. This was a good move!
Once it was all finished, there were a few places where I hadn't quite kept the wheel flush to the surface which causes the width of the stripe to vary. I went back and carefully locally masked up the missing edges; then filled in with a thin modelling brush while the paint was still wet and it all blended in seamlessly.
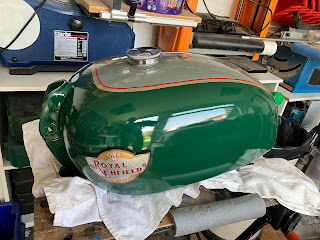
After giving the stripes a day or two to dry, I cleaned down the tank and rear mudguard again, ready to apply the decals. This was just like doing an Airfix kit with waterslide transfers, the key being to make sure you squeegee out any air and water from under them.
First I applied a very light "dust coat" to seal everything, followed by about 3 full coats, which really brought everything to life.
All in all, I was delighted with the results. There are bits all over that I could criticise, but I am so happy that I managed to do it myself.
I am certain that this didn't influence my colour choice, but when I got the tank badges out again, I found that I couldn't have co-ordinated it better if I'd tried!!


No comments:
Post a Comment